Face Blown Up: What It Means and How to Fix It
Face blown up in a photo? Learn the causes, fixes for lens distortion and blown-out highlights, and when Nim templates can help.
By Nim
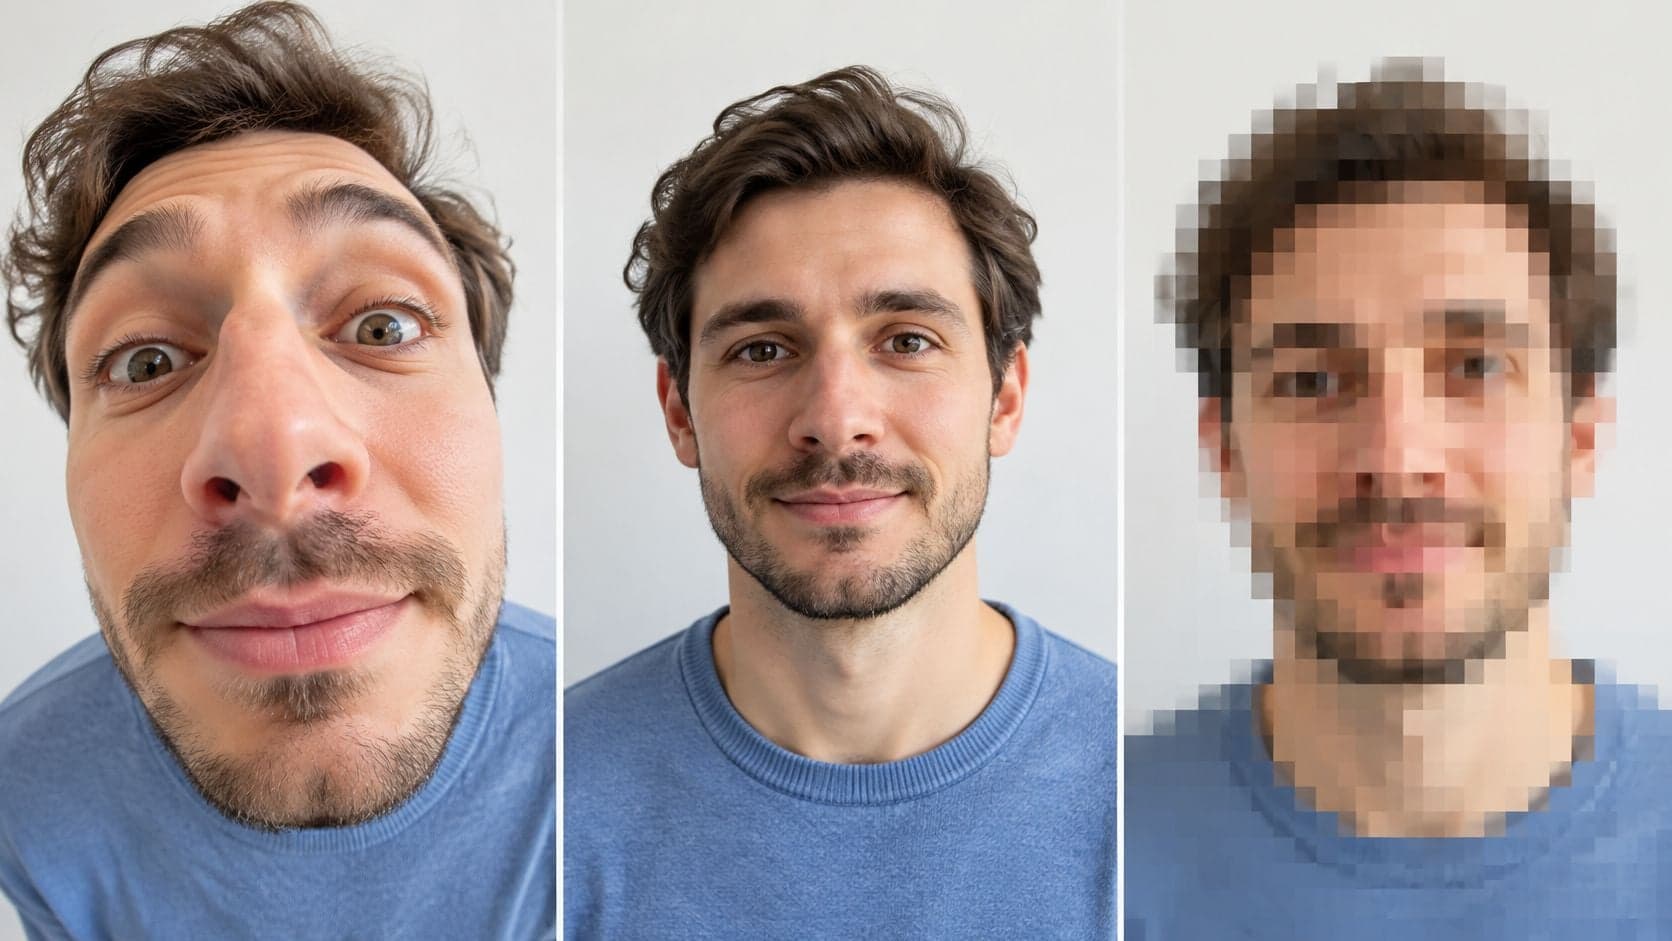
A stretched face is usually a camera-perspective problem, so fix the capture before any enhancement step. Face blown up can describe very different faults, and the right fix depends on which one you have. Stretched proportions come from how the photo was taken. Blown-out highlights remove skin detail, and a soft enlargement starts with too few pixels. Match the picture to its cause first. Otherwise the next tool locks the error in and sharpens it.
Which Meaning of Face Blown Up Applies to You
Use the table below to sort the meanings of face blown up before you open an editor. Find the row that matches what you see, then follow the fix in the right column. Sorting first matters because a face that looks wrong can come from three accidental causes, one planned choice, or wording borrowed from medical and news contexts.
| Meaning | What causes it | Fix |
|---|---|---|
| Stretched face from a wide-angle lens | Subject close to a wide lens, face near the frame edge | Reshoot from farther away and zoom in |
| Blown-out highlights on skin | Strong light, flash or sun on forehead and cheeks | Lower exposure, or reshoot in softer light |
| Soft or pixelated enlargement | Low-resolution photo scaled up | Start from a higher-resolution source and use an upscale step |
| Intentional exaggerated look | Creative choice for an ad or illustration | Plan a labeled illustration and confirm consent |
| Severe facial injury description | Medical or news wording | Not a Nim creation task; seek medical or official sources |
To identify the row, look at the face itself. A nose and forehead that grow larger near the frame edge point to lens position. Flat white patches on skin point to exposure. A file that turns blocky when enlarged points to source resolution.
Lens position changes geometry. Exposure changes tone and detail. Upscaling changes how much real information the file contains. A portrait can show two problems at once, such as lens stretch and harsh highlights; fix the geometry first, because exposure controls cannot move a nose back toward the center of the frame.
Practical rule: Match the image to one row before reading further. The wrong row sends the next hour of work in the wrong direction.
A stretched nose from a close phone shot will not improve if the only change is more sharpness. A forehead with no skin detail left will not gain that detail from a larger file. A tiny selfie scaled up will stay soft until the source itself is better. Adding contrast to blown highlights removes even more skin detail, and scaling a soft selfie again makes the blur larger. Each fix belongs to one cause.
Fix Lens Distortion and Prepare the Source Photo
Hold a phone at arm's length and the wide lens does what a fisheye does to a room: objects nearest the glass swell, while the rest of the frame stays smaller. On a face, that swelling lands on the nose and forehead, and the cheeks pull toward the frame edges. The stretch is a camera-perspective problem. The useful fix happens at capture, before any enhancement or AI step.
Its research sets hold 5,854 corrected and uncorrected wide-angle portrait pairs, as a wide-angle portrait correction paper shows by treating that skew as its own computer-vision problem. The work is about geometry. A sharper file does not undo a lens that was too close.
Enhancement sharpens whatever shape the photo already has. An image-to-video step can then carry that same stretch into every frame. Nim fits after the capture looks right. It does not replace a reshoot when the lens itself enlarged the face.
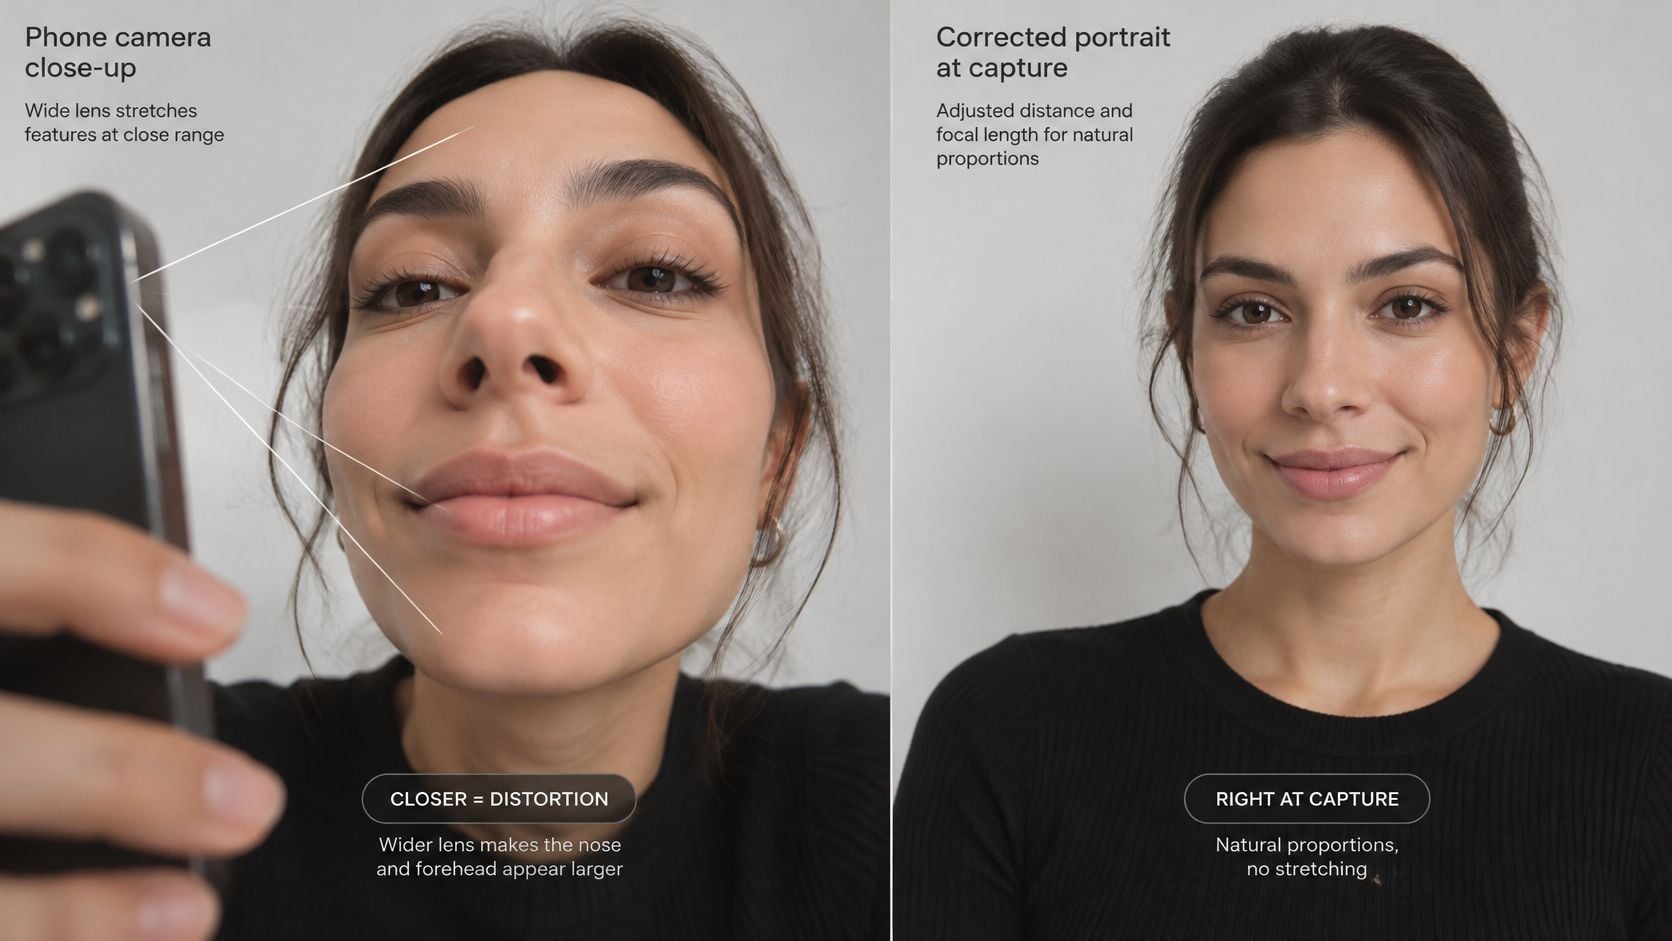
The split above is a conceptual diagram of close wide-angle distortion beside a more natural portrait. It is an illustration, not a Nim output and not a customer result.
A seller filming a product often learns this the hard way. The bottle sits an arm's length from the phone, so the bottle looks huge and the seller's nose balloons beside it. The same pair, photographed from across the table with the lens zoomed in, keeps the bottle readable and the face in proportion. Cropping the close frame hides the edges and leaves the nose the same size.
Reshoot before you enhance
- Open the original and note whether the face sits near an edge.
- Step back and zoom in, rather than moving the camera closer.
- Center the face and keep it away from the frame edges.
- Hold the camera at eye height, with the head level.
- Compare the new photo with a reference of the same person at a normal distance.
- Enhance or animate only after that comparison looks right.
Source photo checklist
- Face sharp and well lit: Landmarks should be easy to see, with light close to the look you want.
- Eyes and mouth visible: Covered features get invented later.
- Nothing over the face: Hands, product packaging, and hair across the eyes all count.
- Roughly frontal: A three-quarter turn is usable. An extreme profile is not.
- No heavy filter or extra compression before upload.
Blur, compression, sunglasses, hands, and deep shadows give a model less reliable identity information, so it fills the gaps. A clean source gives the model real detail to work from. Even then, an enlarged or exaggerated result is a creative interpretation, not recovered evidence of what the person looked like. The model may keep a general likeness while inventing skin texture or contours.
Fix Blown-Out Highlights and Soft Enlargements
Blown-out skin and a soft enlargement look related, because both make a face seem "off," but they are separate fixes.
Clipped highlights
Check the camera preview, or the histogram, for clipped highlights on the forehead and cheeks. Those areas look flat white. Pores and color are gone.
- Lower exposure, or move the flash and the direct sun off the face.
- Reshoot with light diffused through a window, or with a soft source placed beside the subject rather than in front.
- View the new frame at full size before any further edit.
Clipped detail is not hiding in the file. Enhancement cannot put skin texture back where the sensor recorded pure white. A later pass on color, such as the steps in this photo color correction guide, can balance a frame that still has detail. It cannot invent the detail a flash erased. These exposure changes happen in the camera, not as controls inside Nim.
A file that was too small
A soft or pixelated face blown up by scaling started as a low-resolution photo. Scaling a small file only magnifies its blur.
Say a selfie is about 640 pixels wide and cropped tight to the face. At print size it looks soft, because there were never enough pixels for cheeks, lashes, and hair. The full-resolution original from the same shoot still has usable detail. Start there, then open the upscale template page and confirm the input it accepts and whether the output suits that source. Those checks are preparation. They are not buttons this guide can name.
Which Nim Template Fits Each Goal
No verified Nim template is named or documented for a face blown up effect. Nothing below promises that look. Each row is the closest page to open, and only after the source photo is already fixed.
| Goal | Nim page to check | Confirm first |
|---|---|---|
| Sharper, larger version of a small face photo | Upscale: https://nim.video/templates/c/Functional/tool-upscale | Accepted input and whether the output suits the source |
| General quality on a prepared source photo | Image enhancer: https://nim.video/templates/c/Functional/image-enhancer | Accepted input and what the enhancement changes |
| Product photo that includes a person | Enhance product photo: https://nim.video/enhance-product-photo | Whether the template suits images with people |
| Dramatic face effect for an ad or illustration | No verified template named for this effect | Plan a labeled illustration and get consent |
| Face swap for a creative effect | Face swap: https://nim.video/templates/c/trending/face-swap | Consent from the depicted person; not a correction |
Open the page that matches the goal and read what it asks for before uploading. Accepted file types, prompts, and other controls are unknown until that page says so. Do not guess them from a similar template.
A small face photo that only needs to be larger and cleaner belongs with Upscale, if that page accepts the file. General quality on a photo that is already well framed belongs with Image enhancer. A product shot that happens to include a person belongs with Enhance product photo only if that page suits images with people. If it is built for the product alone, it is the wrong stop.
An intentional dramatic face is not a correction. Plan it as a labeled illustration. Face swap is a creative effect, not a repair for lens stretch, and it needs the consent rules in the next section. A mug shot workflow is also not a match for enlarging a face. Its purpose is a different portrait style.
If the goal is a straightforward portrait rather than a bigger face, a professional headshot workflow is a separate task. It does not fix wide-angle stretch either. The source photo still has to be right first.
Consent and Labeling for Altered Faces
Ordinary edits and material ones are not the same job. Cropping, color adjustment, compression, and rescaling leave the person recognizable in context. Face replacement or a substantial change to facial shape can change how a real person appears, even when the only aim was a better portrait.
Under GDPR guidance from the Dutch data protection authority, processing biometric data to uniquely identify a person is a special category of personal data. It is generally prohibited unless a specific legal condition applies. Where consent is the basis, it must be freely given, clearly affirmative, purpose-specific, informed, provable, and withdrawable. A change of purpose needs fresh explicit consent. This is that authority's guidance on biometrics, not a complete legal opinion for every campaign.
Three obligations follow for an identifiable portrait.
- Get permission first. Ask the person depicted before using or publishing the image.
- Do not treat the edit as ID. An enlarged or swapped face is not an identification or verification tool.
- Label material changes on promotional imagery where viewers could mistake the result for an untouched photo.
A study of facial-attribute editing found that those edits can severely degrade automated face recognition, and that the drop remains even with identity-preserving generative models. That is a technical reason, not only a courtesy. Do not reuse an edited face for access control, identity checks, or any decision that needs a reliable biometric match.
Someone who wants a conventional portrait, rather than an exaggerated one, can look at how ParakeetAI professional headshots frames a consented headshot brief. That is a different outcome from a face blown up effect. Changing whose face appears is a further step again, and this guide to changing a face in a photo is the place to separate that creative swap from a simple cleanup.
Check the Result and Choose Your Next Step
A photoreal enlarged face can still be the wrong person in small, important ways. Skin tone, facial structure, hair, and added texture can all shift while the picture still looks sharp.
One evaluation of image-to-image portrait models found skin-lightening effects in 62–71% of outputs overall, with reported rates of 72–75% for Indian and Black source portraits compared with 44% for White source portraits. A polished result is not proof the likeness held.
Review every output before it leaves the draft folder.
- Compare side by side with the original, both at the same size.
- Check identity traits: skin tone, facial shape, eyes, hair, and any texture the model added.
- Confirm recognition and approval. The person should still be recognizable, and should approve the image before publication.
If the output materially changes the person's appearance, label it as an AI-generated creative illustration. AI Video Detector's image forensics guide is a useful outside checklist for spotting edits that a quick glance treats as a normal photograph.
Prepare the source photo with the capture and file steps above, then open the template that matches the cause you already identified.
Nim is a web-based place to upscale a prepared photo, enhance image quality, or apply a consented creative face effect once the source is right. It does not replace a reshoot when the lens or the light caused the face blown up look. Open Nim and check the template that matches the goal before you upload.
- face blown up
- wide angle distortion
- photo enhancement
- portrait editing
- face distortion fix