What Is Product Photography? a Practical Guide
What is product photography? Learn the shots sellers need, how Nim's enhancement and template workflows fit, and when to hire a photographer.
By Nim

Product photography is the deliberate creation of images that show a product clearly, accurately and persuasively for sale, usually as a set of packshots, detail, scale and lifestyle views. A seller photographs a bag, bottle or watch strap on a kitchen table, uploads one decent shot, then watches a shopper zoom in, hesitate over size and color, and leave without buying. That gap between a presentable photo and a photo set that answers buying questions is where most listings succeed or fail.
What Product Photography Means for Sellers
A leather handbag sits in a marketplace listing. The seller cannot hand it across a counter, so the images have to carry the facts a buyer would check in person: silhouette, true color, grain, and how the hardware sits.

A packshot and a lifestyle frame split that work. The packshot cuts the bag out on a plain ground so tan and black variants stay comparable. A lifestyle frame shows the bag on a shoulder or beside a coat, useful for scale and use, weaker for judging grain and clasp.
A working set combines a clean cut-out packshot for instant recognition, alternate angles, detail close-ups, a scale shot, lifestyle scenes and often a short video. One view shows what closes the bag. Another shows whether a laptop fits inside.
How It Differs From General Photography
The product is the subject, not a person or a mood. Accuracy and comparability across variants matter more than atmosphere. Shoot both colors the same way or the difference the shopper sees may be the lighting, not the leather.
That set then has to hold up on a product page, a marketplace listing, and an ad creative. I start by listing the questions the current photos answer, then the questions they still leave open. Color, texture, and size belong on that second list until a specific frame proves them.
Why Shoppers Depend on Product Images
Images replace physical inspection, so shoppers read them for answers before they read any text. The questions are concrete. How large is it, what does the texture look like up close, and is that color accurate or just flattering light?
The stakes are measurable, because in 2025, 62% of online shoppers surveyed in Akeneo's PX Pulse research reported by The Food Institute identified product photos as the most valuable product information. A photo that flatters but misleads doesn't close the gap. It widens it, and the cost shows up later as returns and complaints that the item looked different in person.
Photos as a Visual Specification
Treat the set as a visual specification system where each image holds one informational job. Say a candle listing leads with a warm-lit hero shot on a bedside table but includes no scale view. The buyer can admire the mood and still guess wrong about the height, because nothing in the frame states it.
Making the Set Usable Without Seeing It
Image-heavy pages also exclude shoppers who can't see photos clearly or at all, and AudioEye's 2025 retail analysis found retail pages averaged 14 inaccessible images per page across 2,543 retail websites. Alt text alone won't fix that. Each image needs a description naming the product, color, material and size, and captions on scale and detail shots should state what they show, so the information survives without the picture.
Before changing any photo, a seller should name which question it answers and check whether the full set answers all of them.
The Standard Set of Product Shots
A standard set is built from functional views, not random angles that happened to look good on shoot day. The shopper scans in a predictable order, recognition first, then shape, then detail, then size, then context, and the set should follow that order.
| Shot | What It Answers | Check Before Publishing |
|---|---|---|
| Packshot (front or three-quarter, cut-out) | What the product is and its overall shape | Whole silhouette visible, no cropped edges |
| Alternate angles (side, back, top) | Shape, depth and differences between variants | Same camera distance and focal length for every angle |
| Detail close-ups | Material, stitching, closures and finish | Sharp focus on the feature shoppers ask about |
| Scale shot with reference object | How big or heavy it is | Reference object of known size in the same frame |
| Lifestyle or in-use | Context and intended use | Product remains the clearest element in the scene |
| Short video clip | Motion, texture and use | Lighting and color match the still images |
The Packshot and Alternate Angles
The packshot is the default listing image, front or three-quarter, cleanly cut out. It's the thumbnail in search results, so the silhouette must read instantly. Alternate angles follow from the same camera distance and focal length, because changing either alters apparent proportions and makes variants impossible to compare fairly. Sellers who want reference points for how different approaches read on a page can compare product photography styles before locking their own sequence.
Detail, Scale and Context
Detail close-ups carry the proof work. Stitching, closures, finishes and textures are exactly what shoppers zoom in to verify, and a soft close-up raises the doubt it was meant to remove. The scale shot needs a reference object of known size in the same frame, such as a hand, a coin or a standard bottle, because dimensions in text get skimmed while a visual comparison lands immediately.
Lifestyle and in-use images show context, but the product must remain the clearest element in the scene. A short clip earns its place when motion or texture matters, for example a clasp opening or fabric draping. Sellers short on staging ideas can work through these product picture ideas for ecommerce listings and match each idea to a row in the table rather than shooting whatever looks appealing.
Consistency across variants is the final rule. Shooters should reuse the same angles, distance and order for every color or size, since mismatched angles are the most common cause of confusing listings.
Technical Specs for a Usable Product Image
A shopper inspecting a listing needs enough detail to judge the product's shape and finish. A small or poorly framed file can make that assessment difficult, even when the original photo looked sharp.
| Specification | Reference Value | Source |
|---|---|---|
| Google Merchant Center minimum image size | 1,500 × 1,500 px or larger | Google Merchant Center product image guidance |
| Product share of frame | Roughly 75% to 90% of the frame | Google Merchant Center product image guidance |
| GS1 web-image square range | 900 × 900 to 2,400 × 2,400 px at 300 ppi | GS1 product-image specification |
| GS1 high-resolution square range | 2,401 × 2,401 to 4,800 × 4,800 px at 300 ppi | GS1 product-image specification |
Google Merchant Center recommends product images of 1,500 × 1,500 pixels or larger, with the product occupying roughly 75% to 90% of the frame while its complete silhouette remains visible. These are useful reference values, but marketplace requirements can differ.
Framing and Export Rules
Leave a modest border around the item, then inspect the exported file at 100% magnification. Clipped edges hide product details, and enlarging a small original cannot restore detail that was never captured. The specification applies to the exported file, so measure that file rather than relying on the camera's megapixel count.
For catalog and structured product-data work, the GS1 product-image specification lists a web profile of 900 × 900 through 2,400 × 2,400 pixels at 300 ppi and a high-resolution profile of 2,401 × 2,401 through 4,800 × 4,800 pixels at 300 ppi. A marketplace may set different requirements, so check the destination before preparing the final file.
Practical rule: Keep one high-resolution RGB master, then export channel-specific copies from it instead of re-editing the original for each destination.
Before upload, check the actual file's pixel dimensions, product share of frame, sharpness at full magnification, and complete silhouette.
Lighting, Color and Backgrounds That Hold Up
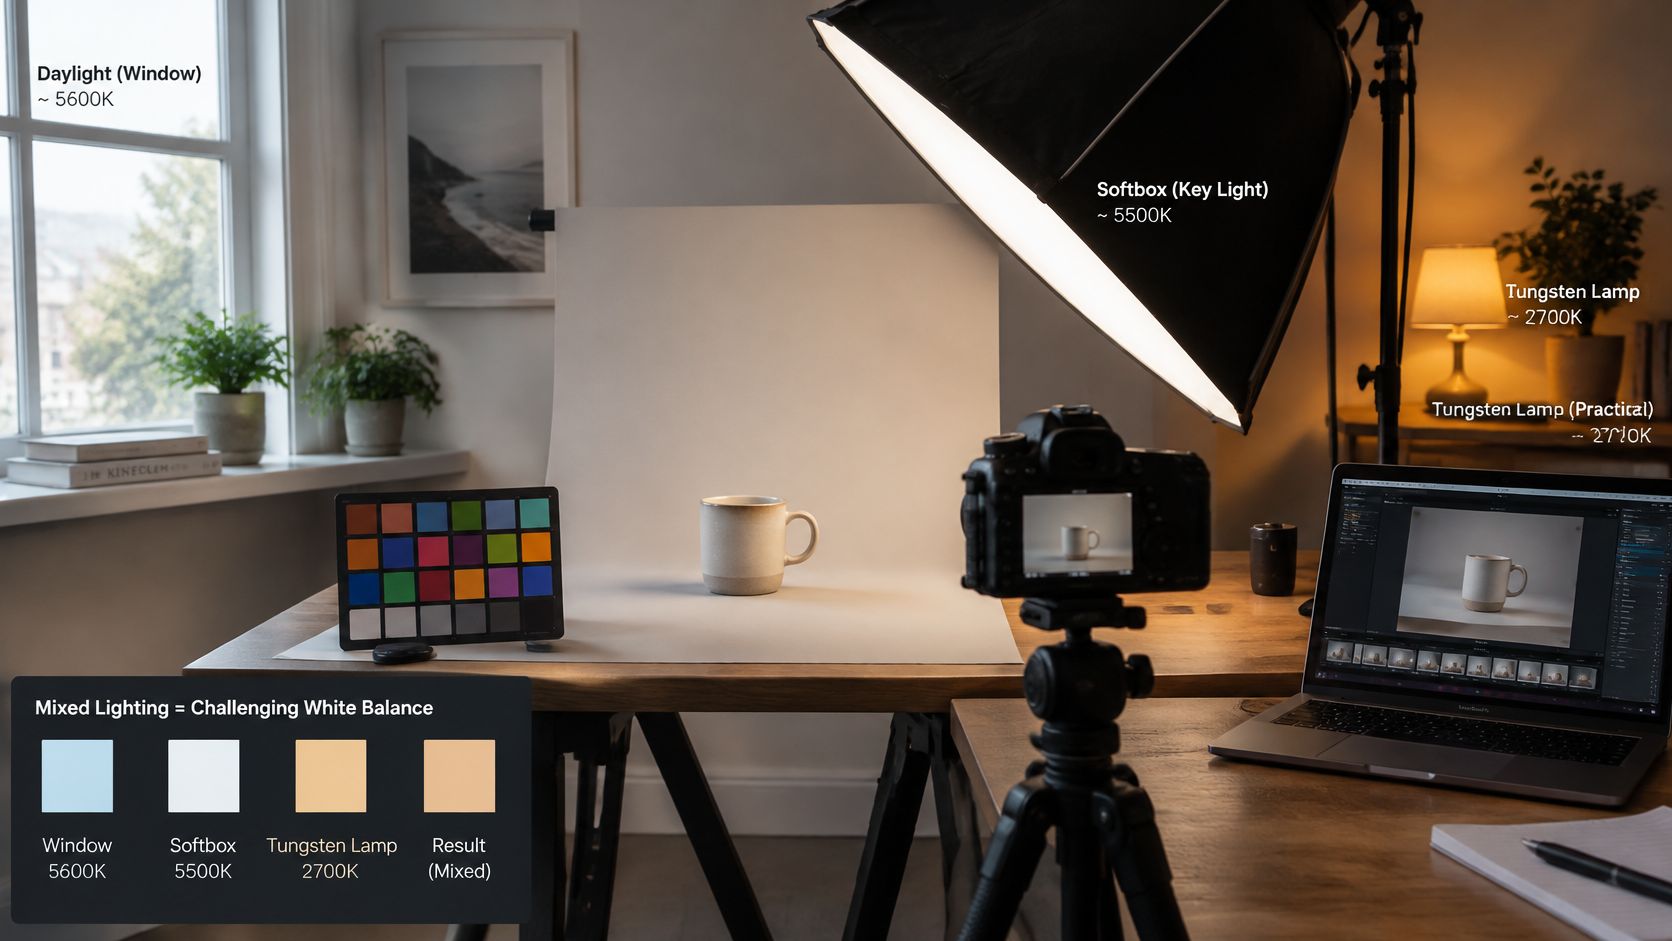
A shopper deciding navy versus black, or matte versus gloss, is reading the light, not the backdrop. Mix daylight from a window with warm household lamps and the frame carries two white-balance errors at once. Correcting one side of the frame shifts the other, so that mixed cast does not come out evenly.
A steadier setup uses one dominant light color. The guide to product photography lighting and color accuracy points to daylight-balanced lighting around 5,000-5,500 K, with a neutral gray card or color checker photographed beside the product so the whole set gets one consistent correction. Reflective pieces raise the difficulty further, and sellers working with metal and stones can consult JewelryBuyDirect's guide to lighting jewelry for setups that control glare without flattening the product.
Why CRI and References Matter
CRI is a 0-100 index describing how faithfully a light renders colors, and higher values generally reduce visible shifts in saturated product colors. Apparel, cosmetics, food packaging and branded goods show the error first. A small hue shift changes the shade or variant a shopper thinks they are buying. After capture, a careful color correction pass on product photos can neutralize a mild cast, but it works only from what the sensor recorded.
Backgrounds and Shadow
A clean background with little or no shadow is the usual catalog look. A soft shadow still earns its place when it grounds a heavy object and stops it floating in the frame.
Presentation fixes sit on top of whatever the light already recorded, so capture must be right first.
When to Use Nim Templates and When to Hire a Photographer
The deciding principle is what the image has to prove. Presentation problems and proof problems need different tools.
| Situation | Start With Nim When | Hire or Shoot When |
|---|---|---|
| Original photo is sharp and complete but cluttered | Enhancing the existing photo presents the product more clearly | Not needed |
| Color must match exactly (packaging, cosmetics, fabric, paint) | The original has been captured under controlled light with a color reference | The capture itself is uncontrolled or color-critical |
| Shoppers need exact size, fit or texture | Used for context and presentation alongside verified scale and detail shots | Scale and detail shots need a physical shoot with a reference object |
| No physical sample exists yet | Concept mockups clearly labelled as illustrations | Wait for a sample, then shoot it |
| Short clip shows use or motion | Short product video template, after confirming its required input | Motion detail must be exact or filmed on a real product |
| Large catalog with many variants | Variant presentation after a verified master set exists | Studio shoot for the master set |
Where Templates Fit
Nim templates suit cases where a sharp, complete original already exists and the problem is presentation. A cluttered background, a flat scene, or a need for context variants for ads all fall in that bucket. The source photo carries the product's real shape and labeling, and the workflow improves how it's shown.
Where a Shoot Is Non-Negotiable
A photographer or controlled studio shoot suits cases where color must be exact, as with packaging, cosmetics, fabric or paint, or where shoppers judge exact size, fit or texture. Those claims rest on capture conditions, not on post-production.
A generated image is not evidence of exact dimensions, faithful physical condition or spectrally accurate color, so every result gets verified against the physical item before publishing.
Accessibility follows the same split. A generated set can look polished and still fail shoppers if close-ups don't show distinguishing features and descriptions aren't written for each view, and alt text is handled outside the template unless the template itself confirms otherwise. For large catalogs, the sequence is master set first from a controlled shoot, then Nim for variant presentation once that master is verified. Concept mockups made before a sample exists must be labelled as illustrations, never presented as the product.
How to Enhance and Template Product Visuals in Nim
The workflow below handles one product visual at a time. Each step exists for a specific reason, and skipping the verification steps is where inaccurate listings come from.
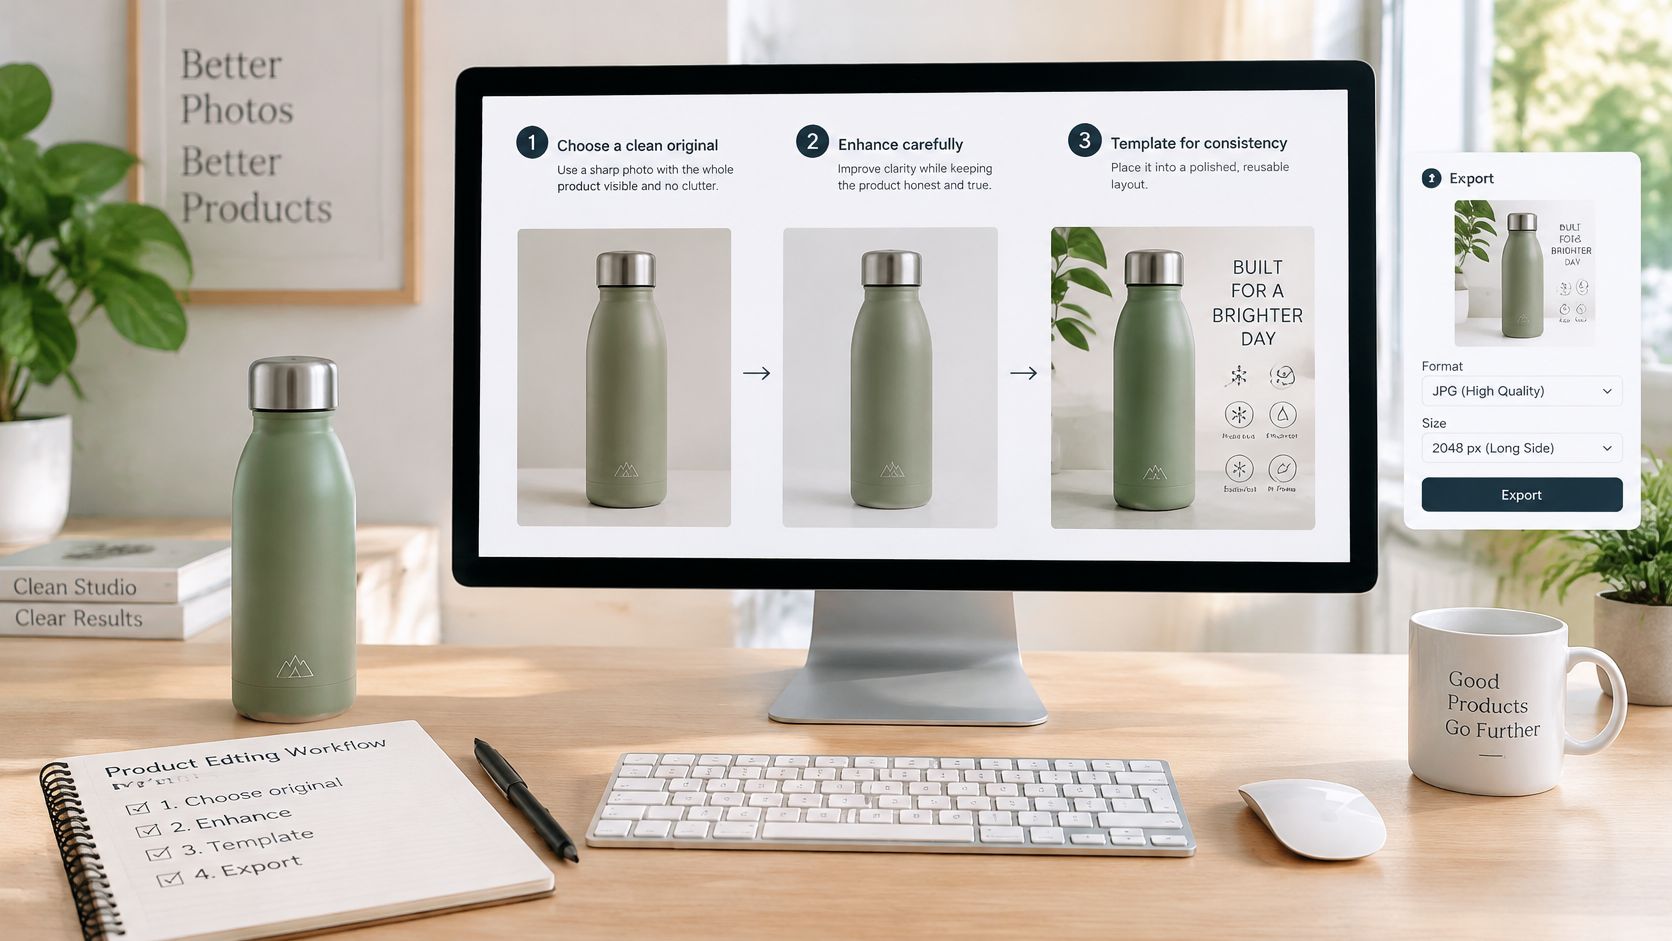
- Choose the source photo first. Pick a sharp original with the whole product visible and no clutter that could be read as part of the product's structure, because enhancement can't restore edges or details the source never captured.
- Open the Enhance product photo workflow. Go to the Enhance product photo tool in Nim rather than a general template browser, since the task is improving an existing product image.
- Enter only what the form asks for. Check the accepted formats and any prompt field in the template form itself, because templates differ and controls shouldn't be assumed from other workflows.
- Generate, then compare against the physical item. Check shape, color, logos, packaging text and edges side by side with the physical item, since those are the details shoppers verify and the ones most likely to drift.
- Keep the original with the approved result. Store both files together so any later dispute about accuracy can be traced, and download the result only if the template shows that option.
- Move to video only after the still passes. For a short clip, open the UGC ads templates and confirm the required input on that page before starting, since a video template may ask for different material than a still workflow.
Sellers comparing approaches can read this overview of an AI product photo generator workflow to see where generation fits relative to enhancement. Once the single-task workflow is clear, the e-commerce templates collection is the place to browse adjacent categories without guessing at URLs.
Throughout, describe and use only the controls the form shows. If a control isn't visible in the template, it isn't part of that workflow, and the step belongs in source preparation or post-review instead.
Pick One Listing to Test First
A strap on the desk next to its listing photo is a check the shopper never gets. Start with one product you can still hold, and a current photo that is already sharp and complete, so the test judges the enhancement rather than a weak source.
Small, variant-heavy goods make mismatches easy to see. On Apple Watch replacement bands style listings, each colorway is its own specification: strap color, buckle shape, edge stitching. Hold the band beside the output and a drift shows up in seconds.
Run that original through the Enhance product photo workflow, then apply step 4: the physical item stays the reference. The new file either matches what that listing must prove, or it does not. If it fails, I treat it as a reshoot, not a maybe you can talk yourself into.
One enhanced hero still leaves size and texture open. Add the scale and detail shots from the standard set before the listing goes live. Move to a short clip only after that still is approved. Nim offers video styles and creation categories including UGC, Keyframes, Motion transfer, Animations, Cinematic, Timelapse, Celebrity selfie and Fashion videos, so the next format is a category choice, not a guess about what the still already showed.
Before a second SKU, write down the question this image is supposed to answer, and whether the approved file answers it.
Open the workflow on Nim and run that one listing.
- product photography
- product photos
- ecommerce product images
- product photo enhancement
- product video